
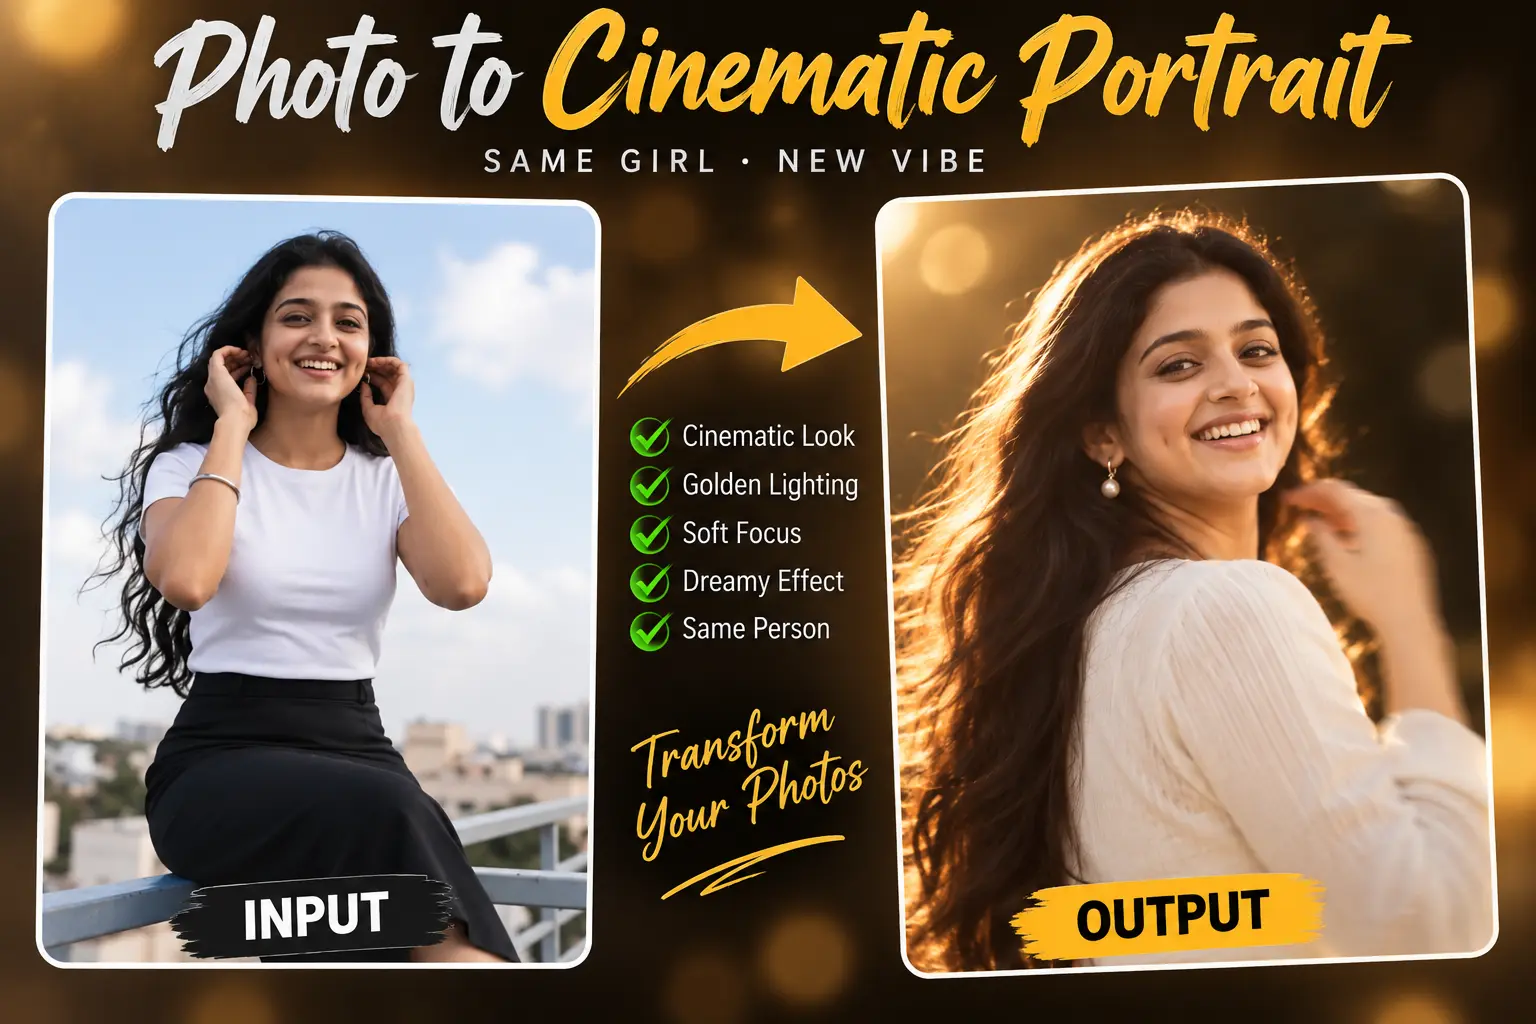
Photo Ko Cinematic Portrait Mein Kaise Convert Karein – AI Prompt & Step-by-Step Guide
Ek normal portrait photo ko warm golden light, soft focus, shallow depth of field aur cinematic mood ke saath transform karne ke liye ready-to-use prompt aur practical workflow.
Quick answer: Haan, ek ordinary portrait ko cinematic-looking image mein transform kiya ja sakta hai, lekin final result AI tool, source photo, prompt interpretation aur selected settings par depend karega. Is guide ka goal ek repeatable process dena hai—sirf ek attractive prompt nahi.
Ready-to-Use AI Cinematic Portrait Prompt
Is prompt ko copy karke apne supported image-generation ya image-editing workflow mein use kar sakte hain. Prompt ko jaan-boojhkar visual details mein divide kiya gaya hai, taaki subject, lighting, composition aur camera style clearly communicate ho.
Step-by-Step: Cinematic Portrait Kaise Banayein
Apni best source photo choose karein
Clear face, sufficient lighting, natural pose aur visible hair wali photo se generally better starting point milta hai. Bahut low-resolution, heavily blurred ya obstructed face wali image avoid karein.
Reference image upload karein
Apne chosen AI image tool mein original photo ko reference/input image ke roop mein add karein. Tool agar image strength, reference strength ya similar control deta hai, to moderate level se start karke result compare karein.
Prompt paste karein
Upar wala cinematic portrait prompt paste karein. Agar aapka tool instruction aur negative prompt ko alag fields mein support karta hai, to unhe separately configure karein.
Composition ko check karein
Generate karne se pehle ensure karein ki prompt mein mid-turn pose, over-the-shoulder look, warm backlight, dark bokeh background aur shallow depth of field clearly mentioned hain.
Multiple variations generate karein
Ek hi generation ko final maan lene ke bajay kuch variations compare karein. Face consistency, hands, earrings, hair edges, clothing aur lighting ko inspect karein.
Final image ko quality-check karein
Eyes, teeth, fingers, earrings, hair strands aur skin texture ko zoom karke dekhein. Agar koi unnatural detail ho, to targeted prompt se correction karein ya doosri variation choose karein.
Better Cinematic Results Ke Liye 8 Practical Tips
“Golden backlight”, “rim light” aur “diffused highlights” jaise terms mood ko clear banate hain.
Dark, blurred bokeh background subject ko visually separate karta hai.
Motion blur ko mainly moving hand/hair tak limit karna natural result de sakta hai.
85mm aur f/1.8 aesthetic shallow depth-of-field style communicate karte hain.
Natural skin texture aur realistic facial details add karne se result less artificial lag sakta hai.
Sharp, properly exposed source image se AI ko visual information better mil sakti hai.
Har generation mein bahut saare changes karne ke bajay lighting, pose ya background ko separately refine karein.
AI image ko publish karne se pehle anatomy, face consistency aur unwanted artifacts check karein.
Common Mistakes Jo Avoid Karni Chahiye
- Bahut generic prompt: Sirf “make it cinematic” likhne se desired lighting aur composition consistently nahi mil sakti.
- Too many conflicting instructions: Bright daylight aur “almost completely dark background” jaise contradictory instructions result ko unpredictable bana sakte hain.
- Hands ko ignore karna: Mid-motion poses mein hands aur fingers ko carefully inspect karein.
- Face ko over-retouch karna: Excessive smooth skin, unrealistic eyes ya altered facial proportions output ko artificial bana sakte hain.
- Original photo ko overwrite karna: Hamesha original input ka backup rakhein.
- Privacy ignore karna: Personal photos upload karne se pehle AI service ki privacy, retention aur training policies samajh lena useful hai.
Quality, Transparency & Responsible Use
Experience: Is workflow mein prompt ko subject, pose, lighting, background, camera look aur quality requirements jaise separate visual components mein define kiya gaya hai. Isse prompt ko systematically test aur refine karna easier hota hai.
Expertise: “85mm” aur “f/1.8” yahan photographic look ko describe karne ke liye use kiye gaye hain. AI-generated image mein actual physical camera settings apply nahi hoti; output tool ki interpretation par depend karta hai.
Authority: Yeh post ek practical prompt guide hai, kisi specific AI platform ka official documentation nahi. Different tools same prompt ko different tarah interpret kar sakte hain.
Trust & transparency: AI-generated output ko original photograph ya real camera photograph ke roop mein misrepresent nahi karna chahiye. Kisi doosre vyakti ki photo use karte waqt appropriate permission aur applicable privacy/consent requirements ka dhyan rakhein.
Is Prompt Ko Apni Photo Ke Liye Kaise Customize Karein?
Aap prompt ke kuch parts ko apne desired style ke according replace kar sakte hain:
- Hair: long dark brown hair → short wavy black hair
- Clothing: cream top → elegant pastel dress
- Accessories: pearl earrings → minimal gold earrings
- Lighting: golden backlight → soft window light
- Background: dark bokeh → blurred garden, studio or city lights
- Mood: romantic → luxury editorial, dreamy or dramatic
Quick Quality Checklist
- ☑ Face natural aur recognizable hai?
- ☑ Eyes sharp aur symmetrical hain?
- ☑ Hands/fingers natural hain?
- ☑ Hair edges realistic hain?
- ☑ Golden rim light believable hai?
- ☑ Background subject ko distract nahi kar raha?
- ☑ Skin texture overly plastic nahi hai?
- ☑ Clothing aur accessories consistent hain?
Frequently Asked Questions
Kya main kisi bhi portrait photo par yeh prompt use kar sakta hoon?
Haan, prompt ko different portrait photos ke saath try kiya ja sakta hai. Lekin pose, face angle, lighting aur source-image quality ke differences ki wajah se results alag ho sakte hain.
Kya AI exactly same face rakhega?
Guarantee nahi hai. Identity preservation tool aur reference settings par depend karti hai. Agar face consistency important hai, identity/reference controls wale workflow ko prefer karein.
85mm lens aur f/1.8 prompt mein kyun diya gaya hai?
Ye terms portrait photography ke familiar visual characteristics—compressed perspective aur shallow depth-of-field look—ko communicate karne mein help kar sakte hain. AI output actual lens settings se nahi banta.
Output mein hands ya face galat aa jaye to kya karein?
Targeted correction prompt try karein, jaise natural hands, five fingers, realistic anatomy, sharp eyes aur natural facial proportions. Agar issue repeat ho, to alternate generation choose karna often faster hota hai.
Kya AI-generated image ko website par publish kar sakte hain?
Generally publish karna possible ho sakta hai, lekin aapko apne selected AI service ke terms, image rights, privacy requirements aur kisi person ki consent situation ko check karna chahiye.
Final Takeaway
Achha cinematic AI portrait sirf ek “magic prompt” se nahi banta. Good input photo + clear visual instructions + suitable reference settings + multiple variations + final quality check milkar zyada reliable workflow banate hain.
Aap upar diya gaya ready-to-use prompt copy karke apne portrait ke saath experiment kar sakte hain aur lighting, outfit, background aur mood ko apni requirement ke according customize kar sakte hain.